lunes, 9 de diciembre de 2019
Android Basic concepts
- Activity
- Service
- Broadcast Receiver
- Content Provider
*Main class that users see when they run the applications.
*Are provided to give a GUI for the user (enables users to give and get info from app)
*Are provided to give a GUI for the user (enables users to give and get info from app)
*Support long running/background operations
*To support interaction with remote processes
*To support interaction with remote processes
*Listen for and respond to events that happen on a device
*Events represented by the intent class and then broadcast
*(example) someone sends you an SMS. My phone has broadcast receiver that have subscribed to them so that they can respond to them
*Events represented by the intent class and then broadcast
*(example) someone sends you an SMS. My phone has broadcast receiver that have subscribed to them so that they can respond to them
*Allow multiple applications to store and share data
*uses database-style interface
*handles interprocess communication
*Browser application uses content providers (saved bookmarks saved in a content provider)
*uses database-style interface
*handles interprocess communication
*Browser application uses content providers (saved bookmarks saved in a content provider)
1. Define Resources (non-source code entities, strings, images, etc)
2. Implement Application Classes
3. Package Application (system packages application components into an .apk file, developers specify required application information in a file called AndroidManifest.XML)4. Install and Run Application
2. Implement Application Classes
3. Package Application (system packages application components into an .apk file, developers specify required application information in a file called AndroidManifest.XML)4. Install and Run Application
LOGIN WITH USERLOGIN AND PASS ONLY
Re: LOGIN WITH USERLOGIN AND PASS ONLY
- mflorell
- Site Admin
- Posts: 17347
- Joined: Wed Jun 07, 2006 2:45 pm
- Location: Florida
jueves, 5 de diciembre de 2019
How to install and configure OpenVPN on OpenSUSE Leap 42.1
VPN or Virtual Private Network is a secure private network over a public network like the internet. A VPN is a secure tunnel trough the internet which protects your data traffic and increases internet privacy and security. Access to the VPN is restricted by secure authentication methods.
OpenVPN is an open source software to build virtual private networks, it uses the OpenSSL library to encrypt the tunneled data and supports UDP or TCP transports. OpenVPN can use pre-shared keys, certificate based and username/password based authentication mechanisms.
In this tutorial, I will show you how to implement a virtual private network using OpenVPNvpn under the Linux operating system OpenSUSE Leap 42.1.
Prerequisites
- OpenSUSE Leap 42.1 - 64bit
- Root privileges
- TUN/TAP enabled
Step 1 - Checking if TUN/TAP is enabled
If you want to create a VPN on your server, make sure TUN/TAP is installed and enabled. You can check that with the command below:
cat /dev/net/tun
The result should be:
cat: /dev/net/tun: File descriptor in bad stateStep 2 - Install OpenVPN
OpenVPN is available in the OpenSUSE repository. You can install it using the zypper command:
zypper in openvpnStep 3 - Easy-RSA Setup
Next, download easy-rsa to generate a certificate file. The easy-rsa is a utility to manage certificates, you can create the root certificate authority with it and request and sign certificates.
Go to the OpenVPN directory and download easy-rsa with the wget command:
cd /etc/openvpn/
wget https://github.com/OpenVPN/easy-rsa/archive/release/2.x.zip
Extract the archive and move the easy-rsa directory:
unzip 2.x.zip
mv easy-rsa-release-2.x/easy-rsa/ /etc/openvpn/
rm -rf easy-rsa-release-2.x/
Configure the Key
Go to the easy-rsa directory and edit the vars file to configure the key and certificate:
cd easy-rsa/2.0/
vim vars
Line 53 - If you are really paranoid, you can increase the key size.
export KEY_SIZE=2048
Line 56 and 59 - In how many days the key and certificate will expire.
export CA_EXPIRE=3650
export KEY_EXPIRE=3650
Line 64 - 72 - Change the default value of the key and certificate information.
export KEY_COUNTRY="US"
export KEY_PROVINCE="California"
export KEY_CITY="SanFrancisco"
export KEY_ORG="Fort-Funston"
export KEY_EMAIL="me@myhost.mydomain"
export KEY_OU="MyOrganizationalUnit"
export KEY_NAME="EasyRSA"
Save the file and exit.
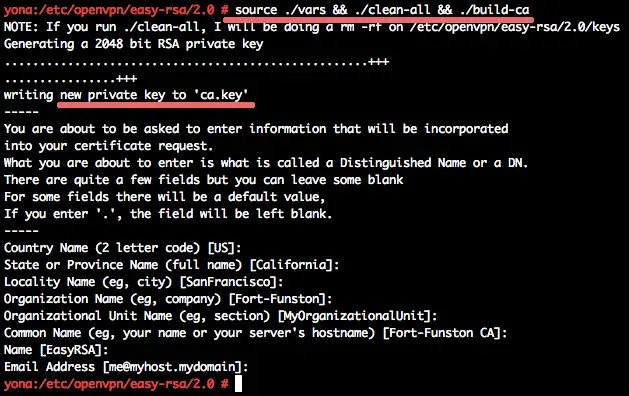
Initialize the PKI
Next, initialize the PKI (Public Key Infrastructure):
source ./vars && ./clean-all && ./build-ca
We will leave the default value, just press "Enter".
Generate Diffie Hellman Parameters
Run the command below:
./build-dh
You will see the output:
Generating DH parameters, 2048 bit long safe prime, generator 2
This is going to take a long time
..................................
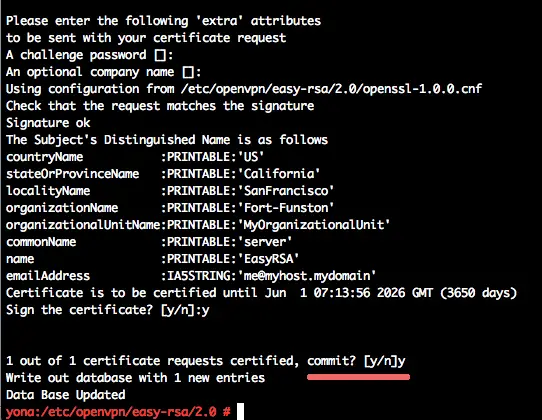
Generate the Server Private Key
Generate the private key with the name "server":
./build-key-server server
Press enter and type "y" to confirm to generate the key.
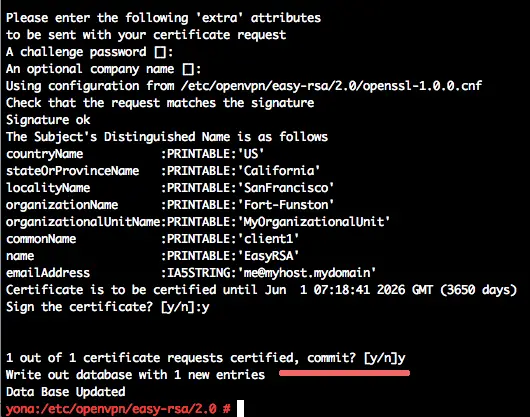
Generate Key and Certificate for the Client
Generate the client key and certificate with name "client1":
./build-key client1
Press enter and type "y" to confirm the key generation.
The key and certificate have been generated in the directory "keys". Now make a copy of the "keys" directory and put it in the "openvpn" directory.
cp -r keys/ /etc/openvpn/Step 4 - Configure OpenVPN
In this step, we will configure OpenVPN to run on UDP protocol, using port 2034 for the client connection. Create the new configuration file server.conf in the OpenVPN directory.
cd /etc/openvpn/
vim server.conf
Paste the configuration below:
#change with your port
port 2034

#You can use udp or tcp
proto udp

# "dev tun" will create a routed IP tunnel.
dev tun

#Certificate Configuration

#ca certificate
ca /etc/openvpn/keys/ca.crt

#Server Certificate
cert /etc/openvpn/keys/server.crt

#Server Key and keep this is secret
key /etc/openvpn/keys/server.key

#See the size a dh key in /etc/openvpn/keys/
dh /etc/openvpn/keys/dh2048.pem

#Internal IP will get when already connect
server 10.10.2.0 255.255.255.0

#this line will redirect all traffic through our OpenVPN
push "redirect-gateway def1"

#Provide DNS servers to the client, you can use goolge DNS
push "dhcp-option DNS 8.8.8.8"
push "dhcp-option DNS 8.8.4.4"

#Enable multiple client to connect with same key
duplicate-cn

keepalive 20 60
comp-lzo
persist-key
persist-tun
daemon

#openvpn status log
status /var/log/openvpn/openvpn-status.log

#enable log
log-append /var/log/openvpn/openvpn.log

#Log Level
verb 3
Save the file and exit the editor.
Next, create a new directory and file for the openvpn log:
mkdir -p /var/log/openvpn/
touch /var/log/openvpn/{openvpn,openvpn-status}.log
Step 5 - Configure SuSEfirewall2
SuSEfirewall2 is a script for generating iptables rules based on the file "/etc/sysconfig/SuSEfirewall2". We will install SuSEfirewall2 and then configure the port to access OpenVPN, then we will enable NAT with an iptables script for OpenVPN.
Install SuSEfirewall2 with the zypper command:
zypper in SuSEfirewall2
Now, go to the sysconfig directory, and edit the SuSEfirewall2 configuration file:
cd /etc/sysconfig/
vim SuSEfirewall2
Line 134 - Enable route.
FW_ROUTE="yes"
Line 253 - Enable TCP port 22 for SSH access from outside the network.
FW_SERVICES_EXT_UDP="22"
Line 267 - Enable udp port for openvpn client access - port 2034.
FW_SERVICES_EXT_UDP="2034"
Line 877 - Enable custom rules SuSEfirewall2.
FW_CUSTOMRULES="/etc/sysconfig/scripts/SuSEfirewall2-custom"
Save and exit.
Next, edit the SuSEfirewall2 custom rules in the scripts directory.
cd /etc/sysconfig/scripts/
vim SuSEfirewall2-custom
Inside of the "fw_custom_after_chain_creation" directive, paste the new iptables rules for OpenVPN:
iptables -A FORWARD -m state --state RELATED,ESTABLISHED -j ACCEPT
iptables -A FORWARD -s 10.10.2.0/24 -j ACCEPT
iptables -A FORWARD -j REJECT
iptables -t nat -A POSTROUTING -s 10.10.2.0/24 -o eth0 -j MASQUERADE
Save and exit.
Note:
IP 10.10.2.0/24 is the network from the server.conf OpenVPN configuration file.
Now we can enable forwarding by adding this new configuration line to the sysctl.conf file.
vim /etc/sysctl.conf
Paste configuration below:
net.ipv4.ip_forward = 1
Save and exit.
Note:
If you have the line already in the file, change the value from "0" to "1" instead of adding a new line.
Now run the command below to apply the configuration change.
sysctl -p
Start SuSEfirewall2 and OpenVPN server:
systemctl start SuSEfirewall2
systemctl start openvpn@server
If you have an error, you can see the detailed error message in the OpenVPN log.
Add all services to the system startup:
systemctl enable SuSEfirewall2
systemctl enable openvpn@server
Step 5 - Configure the Client
Download the client key and certificate from the keys directory to your local computer. You can use the scp command or sftp, I'm here using scp:
Command that has to be run on the local computer.
scp root@serverip:~/etc/openvpn/keys/ca.crt ~/myvpn/
scp root@serverip:~/etc/openvpn/keys/client1.crt ~/myvpn/
scp root@serverip:~/etc/openvpn/keys/client1.key ~/myvpn/
In the myvpn directory, create a new configuration file for the client "client1.ovpn".
cd ~/myvpn/
vim client1.ovpn
Paste the configuration below:
client
dev tun
proto udp

#Server IP and Port
remote SERVERIP 2034

resolv-retry infinite
nobind
persist-key
persist-tun
mute-replay-warnings
ca ca.crt
cert client1.crt
key client1.key
ns-cert-type server
comp-lzo
Save and exit.
To connect to our VPN, you can install a VPN client or if you are using Linux, you can use the "Network-Manager". If you want to test the VPN with a terminal, you can use the command below:
cd ~/myvpn/
sudo openvpn --config client1.ovpn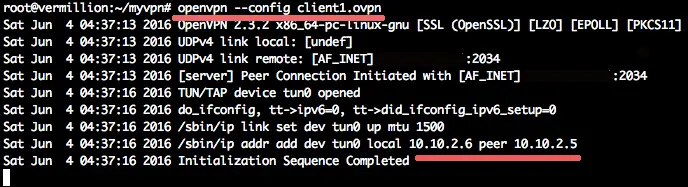
Reference
martes, 8 de octubre de 2019
lunes, 7 de octubre de 2019
viernes, 27 de septiembre de 2019
sábado, 14 de septiembre de 2019
VICIdial transfer
Closer Transfers
If your campaign is set up to allow transfers to closers then you can use the pull-down menu next to the
LOCAL CLOSER button to send calls to closer agents if you click on the LOCAL CLOSER button.
You should find out from your manager which closer group you should send your calls to.
AGENTDIRECT Transfers
A special type of Closer Transfer is an AGENTDIRECT transfer, which is a call that is in a queue for
only one specific agent. If you select an AGENTDIRECT entry from the Local Closer pull-down menu
then an “AGENTS” link will appear to the right of the number to call field. You can click on this link
to see a listing of the available agents that you can make AGENTDIRECT transfers to, and click on
one to select it. From here you can either select the CONSULTATIVE checkbox and click “Dial with
Customer” for an attended transfer, or click on the “Local Closer” button to send the call as a blind
transfer.
CONSULTATIVE Checkbox
This checkbox is only used for calls where you want to have an attended(or consultative) transfer with
a third party that is another ViciDial agent or in-group on your ViciDial system that you have selected
the Local Closer in-group(and optionally the AGENTDIRECT agent) to send the call to. Then you
select this checkbox and click on the “Dial With Customer” button.
viernes, 13 de septiembre de 2019
Merging lists
Re: Merging lists
- mflorell
- Site Admin
- Posts: 17279
- Joined: Wed Jun 07, 2006 2:45 pm
- Location: Florida
Agent Time Detail & Export Calls Report, Calls Mismatch
Re: Agent Time Detail & Export Calls Report, Calls Mismatch
- mflorell
- Site Admin
- Posts: 17277
- Joined: Wed Jun 07, 2006 3:45 pm
- Location: Florida
Suscribirse a:
Entradas (Atom)